Putting Multiple WordPress Containers into Production – Proxy Container
This is follow on to my adventures putting Docker containers into production. The previous article covered building WordPress containers for production. This article deals with how you would run multiple WordPress instances on a single host – by using a proxy.
I discovered running multiple WordPress sites using separate Docker containers in production wasn’t hard at all once you had an overview of the basic ideas involved. To break it down simply – WordPress sites and their databases run in a group that is started with docker-compose. They don’t have their ports exposed to the Host OS. Instead users can connect to it through a separate proxy container, capable of connecting to several WordPress containers. The proxy container does expose its ports on the host.
 The proxy allows us to run multiple WordPress containers on the same machine, and for each to bind to the ports they desire on their own private – docker assigned – IP address, without causing port collisions on the Host OS.
Things To Know Before Starting
The ideas explored here to run multiple applications behind a proxy aren’t solely applicable to WordPress. Any kind of standard app that responds to http requests could be used instead. By the end of the article you will have multiple WordPress instances running through a reverse proxy and the ability to add more running WordPress containers in just a few moments.
The prerequisites to follow this guide are:
- At least 1 WordPress Instance you would like to run, preferably 2 or more.
- A domain, or subdomain, you can point to the site and access to an external DNS that you can point them from.
- A Machine to act as a Docker Host. It needs to have ports 80 and 443 free to run on default configurations.
A few other things to note is that each container group will will have it’s own directory and all of the containers will be running on the same private network created and managed by Docker.
Your hosting box could be anything capable of running Docker on, mine is a VPS running Ubuntu 16.04 with the latest Docker Engine. I covered Installing Docker on Ubuntu in a previous article. The host needs ports 80 and 443 free so the proxy image can bind to them on the Host OS.
The overarching idea of this proxy through docker idea is easy to understand when visualized.
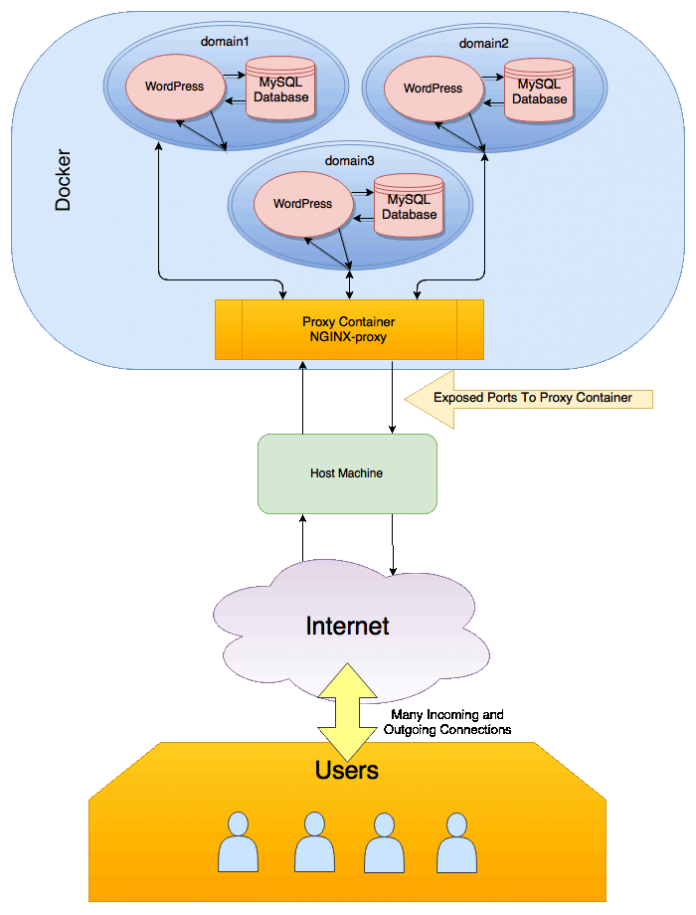
Users connect to the host machine on the ports they expect – either 80 or 443. Those connections are bridged through to the proxy container which knows how to talk to the WordPress containers running behind it.
Container Groups To Be Run In Production
There are 2 main groups of containers that are to be run on the production server.
- The
proxygroup – This group contains 4 individual images.- An instance of NGINX.
- An image to expose a whoami service.
- A docker-gen image used to re-write config files.
- An image to get LetsEncrypt certificates.
- The
wordpressgroup It contains 3 images.- A WordPress Image – I use a slightly custom build of the official WP image to make memcached available with PHP 7.1. The official image or any custom one you may have should work.
- A Database container – I use the MariaDB image here but the official MySQL image is configured, and works, exactly the same.
- An image for running WP-CLI on the WP instance.
The Reverse Proxy Container
![]() The container that will act as a proxy is a specially configured NGINX service. By large the actual installation and base configuration of NGINX is a very close match of the upstream package.
The container that will act as a proxy is a specially configured NGINX service. By large the actual installation and base configuration of NGINX is a very close match of the upstream package.
The customization is handled by rewriting config files and creating vhosts that map to each of the WordPress containers. Once the proxy is running none of the NGINX configuration changes are done manually, they are handled by the docker-gen image and a template.
So that it’s possible to update configuration files on the fly through other container in the group we mount the some volumes to hold files that NGINX uses so they can can be shared with other containers in the group.
The volume configuration and template file are crucial to automating the various config changes needed when starting a new WordPress instance or when changes are made.
Additional Images In the Proxy Group.
There are 3 other images used in the proxy group.
- whoami – This is a simple image used to return a container ID. Here it is used only as an easy way to test if the vhost mapping works correctly.
- docker-gen – Used to rewrite config files based on a provided template.
- letsencrypt-nginx-proxy-companion – This image initiates a connection to the LetsEncrypt service to complete the necessary steps in requesting a certificate, storing it in a shared volume then making the necessary changes to the NGINX config to enable it for the domain.
docker-gen and a 3rd that is the companion LetsEncrypt image. The LetsEncrypt image automatically gets SSL certificates for sites running through the proxy. This way the proxy can secure the connection between it and the end-user.
Docker-gen is a clever little image. While limited in the scope of what it does it is extremely useful. All it is does is write files based on a template. It fills that template with information from environment variables of containers you start and other information in queries about the container. It’s used here to build configurations files with the correct domains and forwarding addresses and to add the references to the domain certificate to ensure secure connections.
Make a Network – Communication isn’t Hard
By default docker-compose puts container groups into their own private network and bridges it on the host. The NGINX image has ways of working within this but for the sake of ease we’ll negate this issue by placing NGINX and the WordPress containers on the same private network. All of our containers will run on this same network.
Before starting any containers make the network (you only have to do this once and you can run the command from any directory).
docker network create nginx-proxy
The NGINX-proxy image
The first group of images we want to get running is the proxy and the rest of the supporting containers.
A good starter compose file is present in the repo of the proxy image that I used. Clone it and enter the directory. You will see there are 2 different docker compose files. We’ll be using the compose file for separate containers. Remove the existing docker-compose.yml file (it is for a single container with docker-gen embeded) and rename the file for separate containers docker-compose.yml.
cp docker-compose.yml docker-compose-single-container.yml
rm docker-compose.yml
cp docker-compose-separate-containers.yml docker-compose.yml
nano docker-compose.yml
Edit the compose file so it matches this:
version: '2'
services:
  nginx:
    image: jwilder/nginx-proxy
    container_name: nginx
    ports:
      - "80:80"
      - "443:443"
    volumes:
      - /etc/nginx/conf.d
      - /etc/nginx/vhost.d
      - /usr/share/nginx/html
      - ./certs:/etc/nginx/certs:ro

  dockergen:
    image: jwilder/docker-gen
    container_name: dockergen
    command: -notify-sighup nginx -watch /etc/docker-gen/templates/nginx.tmpl /etc/nginx/conf.d/default.conf
    volumes_from:
      - nginx
    volumes:
      - /var/run/docker.sock:/tmp/docker.sock:ro
      - ./nginx.tmpl:/etc/docker-gen/templates/nginx.tmpl:ro

  whoami:
    image: jwilder/whoami
    environment:
      - VIRTUAL_HOST=whoami.local

  nginx-letsencrypt:
    image: jrcs/letsencrypt-nginx-proxy-companion
    environment:
#      ACME_CA_URI: https://acme-staging.api.letsencrypt.org/directory
       NGINX_DOCKER_GEN_CONTAINER:dockergen
    container_name: nginx-letsencrypt
    volumes_from:
      - nginx
    volumes:
      - ./certs:/etc/nginx/certs:rw
      - /var/run/docker.sock:/var/run/docker.sock:ro

networks:
  default:
    external:
      name: nginx-proxy
There are 3 sets of modifications compared to the original.
- At the end I’ve configured it to use the nginx-proxy network.
- I added the nginx-letencrypt service.
- I am mounting some additional volumes in some of the services. Pay attention to what is mounted and where.
If you are testing you can bypass the 5 certs/per week/per domain rule and still use letsencrypt and SSL during testing – just uncomment the environment variables in the nginx-lestencrypt service.
Before you start-up the server note that the proxy will try bind to ports and expose them on the Host OS. Those ports need to be available for use on the public facing network interface.
On first run the image for grabbing certificates needs to generate a diffie-hellman group file used in key generation. That may take a few minutes but it’s a one time run thing so let it generate.
# from inside the directory of your nginx-proxy group
docker-compose up
Keep this terminal open so you can see the output when you start the next set of containers.
Note about DNS
Undoubtedly we could handle DNS with another group of containers but I am going to handle the DNS externally, in the way I am used to. Many hosting and domain providers have a DNS service you can access. Handle the DNS however you choose but the domain is going to need to point to IP address of the machine that is acting as the Docker host.
Additionally each database container will need to be assigned a unique hostname, using links, inside of the wordpress containers. This is because each wordpress container references the database host by it’s hostname and, since they are all started with hostname of mysql, a round-robin behaviour is seen caused by the docker networking layer. To ensure each wordpress container can speak to it’s own database container it needs to be a unique hostname. With multiple database containers and replication setup you could take advantage of that round-robin and use it as load balancing, here we are using just a single db container for each site.
The WordPress Container
![]() The next thing to do is get a docker-compose file together for running WordPress sites.
The next thing to do is get a docker-compose file together for running WordPress sites.
The WordPress image I’m using here I built with memcached support running PHP7.1. Guides for building that image is in the preview article about building WordPress containers for production. You could use the official WP image here if you preferred and it would work exactly the same way.
There is another custom image here for adding WP-CLI support. That image is built as somewhat of a container-as-a-tool, rather than as a service. It does not remain running when it’s not in use. You run it and pass desired commands, it performs it’s tasks and provides output then it stops.
When you start these containers with compose it will pull the images, pre-built, from the Docker Hub on the production server.
version: '2'

services:

  wordpress:
    image: pattonwebz/wordpress-php7-1-apache-memcached
    ports:
      - 80
    environment:
      WORDPRESS_DB_USER: database
      WORDPRESS_DB_PASSWORD: kgB7yJCwGYq2jeQH
      WORDPRESS_DB_NAME: wp_database
      WORDPRESS_TABLE_PREFIX: wp_
      WORDPRESS_DB_HOST: mysql_suffix:3306
      VIRTUAL_HOST: example.com,www.example.com
#      VIRTUAL_PROTO: https
      LETSENCRYPT_HOST: example.com,www.example.com
      LETSENCRYPT_EMAIL: user@example.com
    volumes:
      - data_volume:/var/www/html
      - ./home/wp:/home/wp
    links:
      - mysql:mysql_suffix

  mysql:
    image: mariadb
    environment:
      MYSQL_ROOT_PASSWORD: example
      MYSQL_RANDOM_ROOT_PASSWORD: "yes"
      MYSQL_DATABASE: wp_database
      MYSQL_USER: database
      MYSQL_PASSWORD: kgB7yJCwGYq2jeQH
    volumes:
      - db_data:/var/lib/mysql
      - ./home/db:/home/db

  wp:
    image: pattonwebz/docker-wpcli
    volumes_from:
      - wordpress
    links:
      - mysql:mysql_suffix
    entrypoint: wp
    command: "--info"

volumes:
    db_data:
    data_volume:

networks:
  default:
    external:
      name: nginx-proxy
Make sure that a unique password is replaced in the file for the DB user. Because this file contains a plain text password it needs to be stored in a place that is secure. The alternative would be to use docker-secrets to add secure passwords. That’s part of a future article.
The main difference between this file and the one I from the previous article is the addition of a network (it’s the same network as used in the nginx-proxy image) and 4 lines in the WordPress service. These 4 lines are used in combination with the proxy container.
      VIRTUAL_HOST: example.com,www.example.com
#      VIRTUAL_PROTO: https
      LETSENCRYPT_HOST: example.com,www.example.com
      LETSENCRYPT_EMAIL: user@example.com
The LETSENCRYPT_HOST should be the same as the VIRTUAL_HOST – which should be changed to your domain name. Also add the correct email address you want tied to the certificate issued from lets encrypt. You can add multiple hosts, here we have the root and www. subdomains.
The default connection method from nginx-proxy works with the lines above and requires no additional configuration to be up and running for anything that serves content over http or https. If you had a base image that served through https only then tell nginx to only connect to it with https by uncommenting the VIRTUAL_PROTO: https line.
Remapping the Database Hostname to be Unique
Each container set you run will need to have a unique mysql hostname mapped inside the wordpress container. In the example code above anywhere that uses mysql_suffix should be replaced with a unique hostname for that container set. That means adding updating the mysql_suffix in these lines to something unique.
 links:
 - mysql:mysql_suffix
And then updating the db host line that wordpress uses to match the new hostname you linked to the db container.
WORDPRESS_DB_HOST: mysql_suffix:3306
Starting A WordPress Container in Production
The above docker-compose.yml file is enough to get a fresh WordPress site running ready to have a username added and perform the web-based install. It handles data persistence between sessions using volumes and has a local directory mounted inside the containers home directories to make passing files between the container and the Host OS painless.
So long as you have the nginx-proxy group of containers running when you start a container it’ll check for the environment variables added vibrating VIRTUAL_HOST etc and docker-gen will write it’s config files. If the LETSENCRYPT environment variables are set it’ll queue it for a certificate check and fetch. If a change has occurred to the config’s then a restart will be triggered on NGINX.
# from inside your WordPress instance folder
docker-compose up
If you watch the proxy group terminal while the WordPress containers start you will see several messages about it detecting new containers. There will be lines about containers starting and stopping. Not all of the containers need action so don’t worry that most of them out stopped status.
The output from the wordpress group on first run will show the container has to grab an archive containing WordPress, unpack it, and also create it’s database. This takes a few moments, and you may see some MySQl connection errors during the start-up. Next time will be a lot faster.
NOTE: That if your site doesn’t already point to the domain you are running the site for then letsencrypt certificate challenge will fail and no certificate will be issued for the site.
If your domain is already pointed at the correct IP you can access the site right now at its domain. It’s live.
If not you could add an entry to your local hosts file and point it there. For example IP 192.0.1.251 at domain example.com would look something like this:
192.0.1.251 example.com
192.0.1.251 www.example.com
Configuring the WordPress instance – A Fresh Site
Let’s say you were starting a fresh site. The quickest way to get this running is by using the included WP-CLI tool available through each groups wp service.
If you enter the directory of a WordPress instance you can issue WP-CLI commands as if you were local inside the container. You are able to run any WP-CLI command you want – you just need to prefix with docker-compose run --rm .
After the prefix you can run commands exactly like you would usually. The service is named wp, which matches the name usually give to the WP-CLI php executable when it’s added to a user’s PATH.
# this will print the info wp-cli usually gives so you can confirm it works working
docker-compose run --rm wp
# this will reset the database
docker-compose run --rm wp db reset --yes
You can enter this series of commands at the terminal sequentially or add them to a script that can run them all with a single command. I suggest you use a script for the sake of efficiency. A script like this does a lot of things. It first resets the database and configures a fresh instance of WordPress – based on the values provided. It then runs a core update, gets some plugins and a theme then does some work to regenerate images and the permalink structure.
#!/bin/bash

docker-compose run --rm wp db reset --yes
# change values on this line
docker-compose run --rm wp core install --url=http://example.com --title="This is the site title" --admin_user=admin --admin_password=admin --admin_email=example@example.com
# change value on this line
docker-compose run --rm wp option update blogdescription "This is the tagline."
docker-compose run --rm wp core update
docker-compose run --rm wp plugin install customizer-theme-resizer jetpack --activate
docker-compose run --rm wp plugin update --all
# set your theme choice on this line
docker-compose run --rm wp theme install https://downloads.wordpress.org/theme/best-reloaded.0.14.0.zip --activate
docker-compose run --rm wp media regenerate --yes
docker-compose run --rm wp rewrite structure '/%year%/%monthnum%/%postname%' --hard
In the script above replace the setup details with your own – the url, title, email etc. Also update the theme url with the download link of a theme of your choosing. In he example above I picked a random new theme from the WPORG repo. You can install any valid theme so long as it is available at the url you provide.
Save it in a file called fresh.sh and execute it like this:
# create the file and open for edit
nano fresh.sh
# enter the script from above replacing your own values where needed and save it
# set the scripts execute but and run it
sudo chmod +x fresh.sh
sh fresh.sh
When it’s complete you will have a freshly installed WordPress site ready to add your content.
Configuring the WordPress instance – A Site Import
A more realistic situation is you’re importing an existing site into a wordpress group. You will need to pull over your files and the database from the old host. We have mounted volumes pointing for convenience inside the home directory to make this easy. Through a shell inside the containers we’ll be able to extract any archives and run the import tasks.
First you’ll need to grab the site files – usually just the wp-content directory. Remember the container installs a recent WP version and you can use WP-CLI to update core, that will save you transferring that the migration. You’ll also need a copy of the database. A mysqldump file is fine, or you could use phpMyAdmin or any other MySQL management tool. You’ll be able unzip or otherwise decompress files inside your containers so archive them up to save on data transfer and time.
Inside your WordPress container directory you’ll have a home folder. Inside will be a directory that is mounted inside the wordpress container and the database container. Save the files you’ll need in each container to the correct directory and let’s get started the import. In the following commands you will be connecting via name. You can check the names of currently running containers using docker ps command.
#Remember to use your own container name here and replace any other items inside [square brackets] with your own values.
docker ps
sudo docker exec -it [wordpress_container] /bin/bash
# from inside the container
cd /home/wp/
unzip [wp-content.zip]
# note might be permission issues to deal with due to running cp as root
cp wp-content/* /var/www/html/wp-content/ -r
# set correct user/group on the moved files to prevent any issues with root owned files
chown www-data:www-data /var/www/html/wp-content/ -R
Importing the database is a simple mysql command. Just give it a username, tell it to prompt for password, set the database and direct the output of the sql file to it. It’s a one liner but it can take some time for large imports.
#Remember to use your own container name here and replace any other items inside [square brackets] with your own values.
docker ps
sudo docker exec -it [db_container] /bin/bash
# from inside the container
cd /home/db
mysql -u [db_username] -p [db_name] < [db_importfile.sql]
Your site import should be finished and accessible via domain (if you’ve already pointed it that is). You could always use the hosts file trick as a temporary way to access it via domain and test that it functions.
If you wanted to ensure WordPress core and the plugins were at their latest versions at this point you could run this command from the WordPress instance folder.
docker-compose run --rm wp core update
docker-compose run --rm wp plugin update --all
Wrapping up WordPress Docker Containers In Production
So as it happens running WordPress in production with an infrastructure built around Docker wasn’t nearly as hard as it sounds. Once you understand the whole overview shown in the visualization it just becomes a case of deciding on your base configurations. Once you reach the point of deploy it takes only seconds to get a fresh instance. And that’s totally scalable. You can continue to spin up more instances in just a few seconds, you can stop them even faster.
Containerized infrastructure built from individual isolated services is where a lot of momentum in web development world is focused. Deploying WordPress Containers in this way through a proxy and relying on Docker to run your services isolated is a great way to get to grips with many of the overarching concepts of working with Docker.

Thanks for putting this together! Very helpful.
How long is the diffie-hellman portion supposed to take? I have mine running for about 30 minutes now and I’m not sure if its done yet. The last output is:
nginx-letsencrypt | Sleep for 3600s
nginx-letsencrypt | 2017/04/28 06:13:17 Generated ‘/app/letsencrypt_service_data’ from 2 containers
nginx-letsencrypt | 2017/04/28 06:13:17 Running ‘/app/update_certs’
nginx-letsencrypt | 2017/04/28 06:13:17 Watching docker events
nginx-letsencrypt | Sleep for 3600s
nginx-letsencrypt | 2017/04/28 06:13:17 Contents of /app/letsencrypt_service_data did not change. Skipping notification ‘/app/update_certs’
Will docker-compose terminate once its complete?
Thanks!
Hey Paul,
The diffie-hellman generation section usually takes just 1-2 mins. You should be good to terminate the session 🙂
I might have overstated how long the generate section takes in the article. My first few test build half the times it took less than a minute but other times it took more than 5.
Since you have log output like
sleep 3600that means it continued past the generation portion and sounds like its running fine.I’ll update the article to be a little clearer about this later today if I get a few spare moments.
Hope your able to make use of the images to get some sites running in a production type situation with no headaches 🙂
Ahh I see. Thanks for that!
The part I can’t get passed now is having my wordpress container connect to the mysql container. I’m using the exact same yaml that you posted but it just wont connect. You think this is an issue with my firewall (using ufw). I didnt think it would be since I thought dockers creating its own network. I’ve made sure all the environment variables between mariadb and wordpress match.
wordpress_1 | MySQL Connection Error: (1045) Access denied for user ‘database’@’172.18.0.7’ (using password: YES)
wordpress_1 |
wordpress_1 | Warning: mysqli::__construct(): (HY000/1045): Access denied for user ‘database’@’172.18.0.7’ (using password: YES) in – on line 22
Thanks again for this. Can’t wait to move all my sites onto this box.
I figured this out and I figured I should reply in case anyone else runs into it.
I had changed the password for the db user at some point and I had deleted the container and the local volume directory (/home/db) but had no idea its also creating another volume (found it listed in docker volume ls). Deleted every volume/directory/container and started from scratch. It’s working perfectly now!
Thanks again for the guide.
Apologies for the delay in getting back to you about this. Glad you managed to figure this out and get WP talking to the DB successfully.
I’ve been stuck by this very same issue before when I was using Docker only for local dev. I’d change service names often and sometimes even just start afresh in new project directories to get around the issue. It happened to me many times before I know what was going on. I won’t say how many times but… it was a fair few lol
I should have some information in the article about the data volume and the implications data persistence has between upstarts on the containers. Will be updating the article in the next few days to make note about that and a few other things.
Appreciate the feedback here and even more so the fact that you came back to post a solution for others that might have ran into the same thing!
Also I believe this line under mysql.volumes:
– ./homes/db:/home/db
Should be:
– ./home/db:/home/db
right?
Hey again Paul,
Yep this was a typo, well spotted. Fixed 🙂
Getting this error while bringing up the proxy containers.
dockergen_1 | 2017/05/28 10:31:51 Unable to parse template: read /etc/docker-gen/templates/nginx.tmpl: is a directory
nginxproxy_dockergen_1 exited with code 1
Hi Karim, Sorry this isn’t working for you. It looks like the template file used to create the server blocks for the nginx configs can’t be found.
That is my fault entirely – I missed some info from the article about where that
nginx.tmplfile comes from and where it needs to go. I will update the article in the coming days to fix this issue. For now you can follow these steps to get the file in the correct place:Thanks for the post.
However, this is odd but I am having the following issue:
2x such containers set up for 2 different blogs.
I followed your instructions and of course in the docker-compose.yml I use for both containers the proper urls
e.g.
VIRTUAL_HOST: example1.com,www.example1.com
# VIRTUAL_PROTO: https
LETSENCRYPT_HOST: example1.com,www.example1.com
LETSENCRYPT_EMAIL: user@example1.com
and the other
VIRTUAL_HOST: example2.com,www.example2.com
# VIRTUAL_PROTO: https
LETSENCRYPT_HOST: example2.com,www.example2.com
LETSENCRYPT_EMAIL: user@example2.com
But when both run, I am having the issue that when I call for example domain 1 (www.example1.com), I receive the site example1.com and when I run it again, the next time I receive example2.com, run it again, I receive example1.com etc. etc.
Since I only adjusted this for 2 positions. Did I miss anything? It seems that nginx just round robins (load balances) between the two instances.
Any help would be nice
It’s already such a great tutorial, but can’t really use it with this issue
Thanks,
Jens
Thanks for this great tutorial.
However, I am uncertain why, but I do have issues running more than one container.
I adjusted as mentioned:
VIRTUAL_HOST: example.com,www.example.com
# VIRTUAL_PROTO: https
LETSENCRYPT_HOST: example.com,www.example.com
LETSENCRYPT_EMAIL: user@example.com
In either of those containers to the specific domain name. I can also double check the created config of the nginx container. It does contain the correct upstreams (“virtual hosts”).
But what happen is, that on each request a random container responds to the incoming request. I have no way of explaining that behaviour, it is a typical load balancing behaviour.
Does anybody else experience this and did I forgot to add a setting?
Hey Jens,
I apologise because this article does have some pieces of info missing that I need to state. It’s because I accidentally published this post early and am now and trying to backfill what I missed 🙁
The behaviour your seeing is typical round-robin load balancing but it’s actually not being handled by apache or niginx. The docker networking layer is the one doing this and directing the apache process to different database containers on each request. This is happening because it’s pointing to the db container with hostname and when you start 2 container sets with my example compose file those db containers have the same hostname of
mysqlfor both.It is a very quick fix for this though and I will update the article today to add some info about preventing this happening as well as properly document why it’s necessary (or why sometimes it may be preferable to allow this round-robin behaviour)
EDIT:
So the code below has the correct changes for the compose file. Essentially you just need to link the
mysqlcontainer to the other containers with a unique hostname, in this example I’ve just added ‘_suffix’. For each WP site you wanted to run you would make sure whatever ‘_suffix’ you choose is unique for each of the sites to prevent the round robin happening in the networking layer.There are 3 updates in the code below. The fist is the
linksentry in the wordpress container section. The next isWORDPRESS_DB_HOSTgets updated to match the new linked hostname. The last change is updating thelinksin the cli container. Technically the cli container doesn’t need direct access to the db but I think it’s good to get hostnames consistent through an entire container group anyway.version: '2' services: wordpress: image: pattonwebz/wordpress-php7-1-apache-memcached ports: - 80 environment: WORDPRESS_DB_USER: database WORDPRESS_DB_PASSWORD: kgB7yJCwGYq2jeQH WORDPRESS_DB_NAME: wp_database WORDPRESS_TABLE_PREFIX: wp_ WORDPRESS_DB_HOST: mysql-suffix:3306 VIRTUAL_HOST: example.com,www.example.com # VIRTUAL_PROTO: https LETSENCRYPT_HOST: example.com,www.example.com LETSENCRYPT_EMAIL: user@example.com volumes: - data_volume:/var/www/html - ./home/wp:/home/wp links: - mysql:mysql-suffix mysql: image: mariadb environment: MYSQL_ROOT_PASSWORD: example MYSQL_RANDOM_ROOT_PASSWORD: "yes" MYSQL_DATABASE: wp_database MYSQL_USER: database MYSQL_PASSWORD: kgB7yJCwGYq2jeQH volumes: - db_data:/var/lib/mysql - ./home/db:/home/db wp: image: pattonwebz/docker-wpcli volumes_from: - wordpress links: - mysql:mysql-suffix entrypoint: wp command: "--info" volumes: db_data: data_volume: networks: default: external: name: nginx-proxyThanks for the post!
I tried to start multiple installations of wordpress as explained in the tutorial (with unique hostname for mysql container), but Mysql seems to give problems.
This is the output for “docker-compose up”;
prova4_wp_1 exited with code 0
wordpress_1 |
wordpress_1 | Warning: mysqli::__construct(): php_network_getaddresses: getaddrinfo failed: Name or service not known in – on line 22
wordpress_1 |
wordpress_1 | Warning: mysqli::__construct(): (HY000/2002): php_network_getaddresses: getaddrinfo failed: Name or service not known in – on line 22
wordpress_1 |
wordpress_1 | MySQL Connection Error: (2002) php_network_getaddresses: getaddrinfo failed: Name or service not known
Could you help me?
Hi Nicola,
Sorry that this isn’t working for you. Could you share the docker-compose.yml file you have for the wordpress container group? It looks as though the wordpress container isn’t looking in the correct place for the mysql container.
This may be my fault – early publishing of this article has meant I have been frequently going back and correcting things that should have been done before publishing. I might have introduced a mistake.
If you share the compose file I’ll try run it on my local machine and see if I can spot the issue.
Thanks for the timely response, it’s definitely my fault, I probably missed something.
This is my docker-compose.yml:
`
version: ‘2’
services:
wordpress:
image: pattonwebz/wordpress-php7-1-apache-memcached
ports:
– 80
environment:
WORDPRESS_DB_USER: database
WORDPRESS_DB_PASSWORD: kgB7yJCwGYq2jeQH
WORDPRESS_DB_NAME: wp_database
WORDPRESS_TABLE_PREFIX: wp_
WORDPRESS_DB_HOST: mysql-suffix:3306
VIRTUAL_HOST: example.com,www.example.com
# VIRTUAL_PROTO: https
LETSENCRYPT_HOST: example.com,www.example.com
LETSENCRYPT_EMAIL: user@example.com
volumes:
– data_volume:/var/www/html
– ./home/wp:/home/wp
links:
– mysql:mysql-suffix
mysql:
image: mariadb
environment:
MYSQL_ROOT_PASSWORD: example
MYSQL_RANDOM_ROOT_PASSWORD: “yes”
MYSQL_DATABASE: wp_database
MYSQL_USER: database
MYSQL_PASSWORD: kgB7yJCwGYq2jeQH
volumes:
– db_data:/var/lib/mysql
– ./home/db:/home/db
wp:
image: pattonwebz/docker-wpcli
volumes_from:
– wordpress
links:
– mysql:mysql-suffix
entrypoint: wp
command: “–info”
volumes:
db_data:
data_volume:
networks:
default:
external:
name: nginx-proxy
`
Ups…
Is This:
version: ‘2’
services:
wordpress:
image: pattonwebz/wordpress-php7-1-apache-memcached
ports:
– 80
environment:
WORDPRESS_DB_USER: database
WORDPRESS_DB_PASSWORD: kgB7yJCwGYq2jeQH
WORDPRESS_DB_NAME: wp_database
WORDPRESS_TABLE_PREFIX: wp_
WORDPRESS_DB_HOST: mysql_exmpl:3306
VIRTUAL_HOST: exmplec.ml,www.exmplec.ml
# VIRTUAL_PROTO: https
LETSENCRYPT_HOST: exmplec.ml,www.exmplec.ml
LETSENCRYPT_EMAIL: zeronicola3@gmail.com
volumes:
– data_volume:/var/www/html
– ./home/wp:/home/wp
links:
– mysql:mysql_exmpl
mysql:
image: mariadb
environment:
MYSQL_ROOT_PASSWORD: example
MYSQL_RANDOM_ROOT_PASSWORD: “yes”
MYSQL_DATABASE: wp_database
MYSQL_USER: database
MYSQL_PASSWORD: kgB7yJCwGYq2jeQH
volumes:
– db_data:/var/lib/mysql
– ./home/db:/home/db
wp:
image: pattonwebz/docker-wpcli
volumes_from:
– wordpress
links:
– mysql:mysql_exmpl
entrypoint: wp
command: “–info”
volumes:
db_data:
data_volume:
networks:
default:
external:
name: nginx-proxy
Hi again,
I really am not sure what is causing mysql connection issue in your container group. I reformatted your code into this and ran it. The only thing I can see here is the use of curly quotation marks
version: ‘2’andMYSQL_RANDOM_ROOT_PASSWORD: “yes”and long hyphens in arrays such as this:– 80but I think those were probably added by the comment handler when you posted on this site.After formatting I was able to run this compose file and have it connect to the mysql container. Could you try this and see if it works your end?
version: '2' services: wordpress: image: pattonwebz/wordpress-php7-1-apache-memcached ports: - 80 environment: WORDPRESS_DB_USER: database WORDPRESS_DB_PASSWORD: kgB7yJCwGYq2jeQH WORDPRESS_DB_NAME: wp_database WORDPRESS_TABLE_PREFIX: wp_ WORDPRESS_DB_HOST: mysql_exmpl:3306 VIRTUAL_HOST: exmplec.ml,www.exmplec.ml # VIRTUAL_PROTO: https LETSENCRYPT_HOST: exmplec.ml,www.exmplec.ml LETSENCRYPT_EMAIL: zeronicola3@gmail.com volumes: - data_volume:/var/www/html - ./home/wp:/home/wp links: - mysql:mysql_exmpl mysql: image: mariadb environment: MYSQL_ROOT_PASSWORD: example MYSQL_RANDOM_ROOT_PASSWORD: "yes" MYSQL_DATABASE: wp_database MYSQL_USER: database MYSQL_PASSWORD: kgB7yJCwGYq2jeQH volumes: - db_data:/var/lib/mysql - ./home/db:/home/db wp: image: pattonwebz/docker-wpcli volumes_from: - wordpress links: - mysql:mysql_suffix entrypoint: wp command: "--info" volumes: db_data: data_volume: networks: default: external: name: nginx-proxyThank you very much for helping!
In my local machine everything works, but in a DigitalOcean’s droplet the error appears.
It all depends on the memory that the system has available, I fix it by adding a swapfile to my droplet following this post: https://www.digitalocean.com/community/tutorials/how-to-add-swap-space-on-ubuntu-16-04
Thanks again!
Hi Nicola,
I’m glad you got it sorted. I didn’t initially suspect a memory related issue but that makes sense and I have seen mysql services unexpectedly exit when memory is exhausted.
Glad you got it all sorted though. I hope you use it to put awesome things on the internet 😀
Hi William,
Another great article. I’m trying to run the example, but get an error: nginx-letsencrypt | Reloading nginx proxy (b0f799671411041b1a1b990421cfaf5986320eaa5ad9c8038b54738843b5d74e)…
nginx-letsencrypt | ,sh: 1: /usr/local/bin/docker-gen: not found. Did I miss something in the process?
Thanks
Hey again 🙂
My test setup for this has the same messages in the logs. I think the combination of volumes I have configured is confusing things and the let’s encrypt container is looking in wrong place for the script to trigger dockergen. But here I have dockergen watching and reloading anyway so I think it is working anyway. I’ve had this tests setup running in production no problems for maybe 5 or 6 months even with that message.
Yeah, this one is quite tricky… It took me some days before I found a solution to this:
You have to tell the lets-encrypt-container, what container “docker-gen” is.
Just add two lines to the “letsencrypt” part of the nginx-proxy-conf docker-compose-file (I did it just below the volumes), and everything works just fine:
environment:
– NGINX_DOCKER_GEN_CONTAINER=dockergen
Yours,
Peter.
P.S.: Thank you for that Article, William. It was the startingpoint of my docker-adventures and it showed me some things I did not find elsewhere…
Hey Peter,
This is exactly the solution and I see that already it has been a useful comment to someone else reading this article 🙂 Thanks a bunch for returning and posting the solution for everyone, I have updated the example in the article with the new line.
When I first started writing this article the letsencrypt companion image image did not have the ability to pass this as an ENV variable and instead needed to use –label on the dockergen container instead. I followed the PR for the update and made sure to include it in production… I did not update my test setup to the latest letsencrypt image though so the article here ended up with examples written based partly on old –label method, partly on new ENV method. Should all be fixed now thanks to your helpful comment though 🙂
Happy to have helped you on your docker adventures. Docker is such a new technology many people (including me) are only just starting with it and learning how useful it can be (once you get over that massive learning curve to start with!).
William.. brilliant! thanks for sharing this!
Peter, thanks for reporting this! This is what my nginx-letsencrypt entry looks like that works (nginx (docker-compose.yml file))
nginx-letsencrypt:
image: jrcs/letsencrypt-nginx-proxy-companion
environment:
# ACME_CA_URI: https://acme-staging.api.letsencrypt.org/directory
– NGINX_DOCKER_GEN_CONTAINER=dockergen
container_name: nginx-letsencrypt
volumes_from:
– nginx
volumes:
– ./certs:/etc/nginx/certs:rw
– /var/run/docker.sock:/var/run/docker.sock:ro
Nicola.. thanks as well. I was stuck for a day trying to figure out why a subdomain wouldn’t run.. turns out memory issue on my scrawny DO instance.
Good stuff! Thanks again.
Hey Steve,
I am glad that you got things working and the comments from Peter and Nicola have been helpful for me too 🙂
Seems that many of us are fans of Digital Ocean and yet none of our apps are fans of the small memory droplets lol.
Hey, nice tutorial. Do I need to use multiple docker-compose files of wordpress for running multiple sites? or what? Can you give a short example of modification required in the current setup?
Hey, what do I need to do in current wordpress docker compose file to run 2-3 wordpress sites on single host. Do I need to create multiple compose files and run them? Can you give an example for this?
Hey Shantandu,
For each WordPress site you want to run you would create a new docker-compose.yml file in it’s own directory. Each of compose files for each site needs to be updated to have the correct virtual host values and to remap mysql to a unique hostname (done by changing `mysql_suffix` in each compose file to something unique). Here is 2 example compose files that could be started to run 2 sites. If you need any help modifying these farther give me a shout 🙂
examplesite1.com:
version: '2'

services:

  wordpress:
    image: pattonwebz/wordpress-php7-1-apache-memcached
    ports:
      - 80
    environment:
      WORDPRESS_DB_USER: database
      WORDPRESS_DB_PASSWORD: 4KLu7yJCwGYq2jeQH
      WORDPRESS_DB_NAME: wp_database
      WORDPRESS_TABLE_PREFIX: wp_
      WORDPRESS_DB_HOST: mysql_s1:3306
      VIRTUAL_HOST: examplesite1.com,www.examplesite1.com
#      VIRTUAL_PROTO: https
      LETSENCRYPT_HOST: examplesite1.com,www.examplesite1.com
      LETSENCRYPT_EMAIL: user@example.com
    volumes:
      - data_volume:/var/www/html
      - ./home/wp:/home/wp
    links:
      - mysql:mysql_s1

  mysql:
    image: mariadb
    environment:
      MYSQL_ROOT_PASSWORD: example
      MYSQL_RANDOM_ROOT_PASSWORD: "yes"
      MYSQL_DATABASE: wp_database
      MYSQL_USER: database
      MYSQL_PASSWORD: 4KLu7yJCwGYq2jeQH
    volumes:
      - db_data:/var/lib/mysql
      - ./home/db:/home/db

  wp:
    image: pattonwebz/docker-wpcli
    volumes_from:
      - wordpress
    links:
      - mysql:mysql_s1
    entrypoint: wp
    command: "--info"

volumes:
    db_data:
    data_volume:

networks:
  default:
    external:
      name: nginx-proxy
examplesite2.com
version: '2' services: wordpress: image: pattonwebz/wordpress-php7-1-apache-memcached ports: - 80 environment: WORDPRESS_DB_USER: database WORDPRESS_DB_PASSWORD: kgB7yJCwGYq2jeQH WORDPRESS_DB_NAME: wp_database WORDPRESS_TABLE_PREFIX: wp_ WORDPRESS_DB_HOST: mysql_s2:3306 VIRTUAL_HOST: examplesite2.com,www.examplesite2.com # VIRTUAL_PROTO: https LETSENCRYPT_HOST: examplesite2.com,www.examplesite2.com LETSENCRYPT_EMAIL: user@example.com volumes: - data_volume:/var/www/html - ./home/wp:/home/wp links: - mysql:mysql_s2 mysql: image: mariadb environment: MYSQL_ROOT_PASSWORD: example MYSQL_RANDOM_ROOT_PASSWORD: "yes" MYSQL_DATABASE: wp_database MYSQL_USER: database MYSQL_PASSWORD: kgB7yJCwGYq2jeQH volumes: - db_data:/var/lib/mysql - ./home/db:/home/db wp: image: pattonwebz/docker-wpcli volumes_from: - wordpress links: - mysql:mysql_s2 entrypoint: wp command: "--info" volumes: db_data: data_volume: networks: default: external: name: nginx-proxyIs it possible to replace apache service with Nginx? And is it even possible to altogether remove apache/Nginx and rely on a single Nginx container to send requests?
Hey again Shantanu,
You can replace the apache service with an Nginx one, or any other service that responds to http requests, very easily.
The Proxy container is configured to work with any container on attached networks that has a
VIRTUAL HOSTenvironment variable and responds to http. You would just add the virtual host variable (and the lets encrypt variables if you want https) to the compose file for the other container you want to proxy. I do this to proxy other services running through a number of different http servers including nginx proxy > nginx backend.As for removing the backend services altogether and having just a single Nginx container to send and make requests. That sounds like you mean something like a forward proxy – where you request a site and it would route through the proxy container – the proxy would make the request on your behalf and then send you the response. Is that what you mean?
That also is possible but would require a different kind of setup with client side changes and a different proxy image built for forward proxying. It is possible to configure Nginx to act like this but I suggest you also look into
SquidorVarnishwhich are probably more commonly used in the situation I think you are looking into.That kind of thing is quite far from what this article is about so if you would like help looking into it more send me an email through the contact form and we can discuss some more 🙂
So I can also separate php7 and nginx along with their respective volumes, right? For forward proxying, I’ll e-mail you just to clear the air. Thanks for the reply.
Hey,
How can I access the site without using the port? Right now, I need to use a port like example.com:32777 which is weird according to me. This should not be needed while using nginx proxy, right?
Hey,
To connect to a site through the proxy you should not need to include the port number of the backend container.
If you are connecting with a port number I expect you might be bypassing the proxy and connecting directly to the WP container.
With the setup in this article it should work without ports so long as DNS for the domain points to the public IP of the proxy and the proxy is allowed to bind to ports 80 and 443 on the public IP.
Do you see any errors from the proxy at startup or any error from any of the other containers in the proxy group while they are running?
Hey, the problem I am facing is when I try running two WP sites one by one, all the requests to second WP sites are routed to the first site.
Hmmm this sounds like it could possibly be 2 things. Are you certain the requests are being routed to the first WP container?
It might be that the requests go to the 2nd WP container but that is connecting to the 1st groups DB container.
Are you running the containers locally or somewhere online? Locally there is some tweaks needed to hosts file that docker-compose does not handle on it’s own.
I was running this on DO droplet. Here’s the docker-compose file of first site:
version: ‘2’
services:
wordpresso:
restart: always
image: wordpress:php7.0-fpm-alpine
environment:
– WORDPRESS_DB_USER=database
– WORDPRESS_DB_PASSWORD=4KLu7yJCwGYq2jeQ
– WORDPRESS_DB_NAME=wp_database
– WORDPRESS_TABLE_PREFIX=wp_
– WORDPRESS_DB_HOST=mysql_demo:3306
– VIRTUAL_HOST=freakytanenbaum.ml, http://www.freakytanenbaum.ml
volumes:
– data_volume:/var/www/html
– ./home/wp/:/home/wp
ports:
– “9000”
links:
– mysql:mysql_demo
nginx-for-freakytanenbaum:
restart: always
image: giuseppeiannelli/nginx-for-wordpress-phpfpm
environment:
– VIRTUAL_HOST=freakytanenbaum.ml, http://www.freakytanenbaum.ml
volumes_from:
– wordpresso
ports:
– “80”
mysql:
image: mariadb
environment:
MYSQL_ROOT_PASSWORD: example
MYSQL_RANDOM_ROOT_PASSWORD: “yes”
MYSQL_DATABASE: wp_database
MYSQL_USER: database
MYSQL_PASSWORD: 4KLu7yJCwGYq2jeQ
volumes:
– db_data:/var/lib/mysql
– ./home/db:/home/db
wp:
image: pattonwebz/docker-wpcli
volumes_from:
– wordpresso
links:
– mysql:mysql_demo
entrypoint: wp
command: “–info”
volumes:
db_data:
data_volume:
networks:
default:
external:
name: nginx-proxy
Here’s the second one:
version: ‘2’
services:
wordpress:
restart: always
image: wordpress:php7.0-fpm-alpine
environment:
– WORDPRESS_DB_USER=database
– WORDPRESS_DB_PASSWORD=kgB7yJCwGYq2jeQH
– WORDPRESS_DB_NAME=wp_database
– WORDPRESS_TABLE_PREFIX=wp_
– WORDPRESS_DB_HOST=mysql_demo4:3306
– VIRTUAL_HOST=cddemo.gq, http://www.cddemo.gq
volumes:
– data_volume:/var/www/html
– ./home/wp/:/home/wp
ports:
– “9000”
links:
– mysql:mysql_demo4
nginx-for-wordpress-phpfpm:
restart: always
image: giuseppeiannelli/nginx-for-wordpress-phpfpm
environment:
– VIRTUAL_HOST=cddemo.gq, http://www.cddemo.gq
– LETSENCRYPT_HOST=cddemo.gq, http://www.cddemo.gq
– LETSENCRYPT_EMAIL=shantanu.deshpande@rtcamp.com
volumes_from:
– wordpress
ports:
– “80”
mysql:
image: mariadb
environment:
MYSQL_ROOT_PASSWORD: example
MYSQL_RANDOM_ROOT_PASSWORD: “yes”
MYSQL_DATABASE: wp_database
MYSQL_USER: database
MYSQL_PASSWORD: kgB7yJCwGYq2jeQH
volumes:
– db_data:/var/lib/mysql
– ./home/db:/home/db
wp:
image: pattonwebz/docker-wpcli
volumes_from:
– wordpress
links:
– mysql:mysql_demo4
entrypoint: wp
command: “–info”
volumes:
db_data:
data_volume:
networks:
default:
external:
name: nginx-proxy
Is there anything I am missing? This might sound silly. Apologies for that.
Hey,
Sorry it took me so long to get back to you, been a busy week.
So I don’t know for certain if this is the cause of your exact issue but I do see a misconfiguration.
The `VIRTUAL_HOST` environment variable needs to be set on the backend that you want the proxy to look to for the content. In your case that would be the nginx image in these groups.
If you remove remove the `VIRTUAL_HOST` from the wordpress images and leave it on the nginx ones I think it may solve your problems 🙂
Hey,
Thanks for the reply. Got this working by setting correct VIRTUAL_HOST and removing VIRTUAL_PORT variable which I was setting for sites.
I’m having trouble when I’m spinning up the wordpress and database container.. the log keeps showing that wordpress is unable to connect to the database. Any suggestions? I made sure that the passwords are the same in the composer file.
“`
version: ‘2’
services:
wordpress:
image: pattonwebz/wordpress-php7-1-apache-memcached
ports:
– 80
– 443
environment:
WORDPRESS_DB_USER: username
WORDPRESS_DB_PASSWORD: mypassword
WORDPRESS_DB_NAME: username_db
WORDPRESS_TABLE_PREFIX: wp_username_
WORDPRESS_DB_HOST: mysql_username:3306
VIRTUAL_HOST: username.com,www.username.com
# VIRTUAL_PROTO: https
LETSENCRYPT_HOST: username.com,www.username.com
LETSENCRYPT_EMAIL: hello@username.com
volumes:
– data_volume:/var/www/html
– ./home/wp:/home/wp
links:
– mysql:mysql_username
mysql:
image: mariadb
environment:
MYSQL_ROOT_PASSWORD: example
MYSQL_RANDOM_ROOT_PASSWORD: “yes”
MYSQL_DATABASE: username_db
MYSQL_USER: username
MYSQL_PASSWORD: mypassword
volumes:
– db_data:/var/lib/mysql
– ./home/db:/home/db
wp:
image: pattonwebz/docker-wpcli
volumes_from:
– wordpress
links:
– mysql:mysql_username
entrypoint: wp
command: “–info”
volumes:
db_data:
data_volume:
networks:
default:
external:
name: nginx-proxy
“`
“`
mysql_1 | 2017-09-21 17:15:09 139749943555968 [Note] mysqld (mysqld 10.2.8-MariaDB-10.2.8+maria~jessie) starting as process 1 …
mysql_1 | 2017-09-21 17:15:09 139749943555968 [Note] InnoDB: Mutexes and rw_locks use GCC atomic builtins
mysql_1 | 2017-09-21 17:15:09 139749943555968 [Note] InnoDB: Uses event mutexes
mysql_1 | 2017-09-21 17:15:09 139749943555968 [Note] InnoDB: Compressed tables use zlib 1.2.8
mysql_1 | 2017-09-21 17:15:09 139749943555968 [Note] InnoDB: Using Linux native AIO
mysql_1 | 2017-09-21 17:15:09 139749943555968 [Note] InnoDB: Number of pools: 1
mysql_1 | 2017-09-21 17:15:09 139749943555968 [Note] InnoDB: Using SSE2 crc32 instructions
mysql_1 | 2017-09-21 17:15:09 139749943555968 [Note] InnoDB: Initializing buffer pool, total size = 256M, instances = 1, chunk size = 128M
mysql_1 | 2017-09-21 17:15:09 139749943555968 [Note] InnoDB: Completed initialization of buffer pool
mysql_1 | 2017-09-21 17:15:09 139749202937600 [Note] InnoDB: If the mysqld execution user is authorized, page cleaner thread priority can be changed. See the man page of setpriority().
mysql_1 | 2017-09-21 17:15:09 139749943555968 [Note] InnoDB: Highest supported file format is Barracuda.
mysql_1 | 2017-09-21 17:15:09 139749943555968 [Note] InnoDB: 128 out of 128 rollback segments are active.
mysql_1 | 2017-09-21 17:15:09 139749943555968 [Note] InnoDB: Creating shared tablespace for temporary tables
mysql_1 | 2017-09-21 17:15:09 139749943555968 [Note] InnoDB: Setting file ‘./ibtmp1’ size to 12 MB. Physically writing the file full; Please wait …
mysql_1 | 2017-09-21 17:15:10 139749943555968 [Note] InnoDB: File ‘./ibtmp1’ size is now 12 MB.
mysql_1 | 2017-09-21 17:15:10 139749943555968 [Note] InnoDB: Waiting for purge to start
mysql_1 | 2017-09-21 17:15:10 139749943555968 [Note] InnoDB: 5.7.19 started; log sequence number 1620210
mysql_1 | 2017-09-21 17:15:10 139748966393600 [Note] InnoDB: Loading buffer pool(s) from /var/lib/mysql/ib_buffer_pool
mysql_1 | 2017-09-21 17:15:10 139748966393600 [Note] InnoDB: Buffer pool(s) load completed at 170921 17:15:10
mysql_1 | 2017-09-21 17:15:10 139749943555968 [Note] Plugin ‘FEEDBACK’ is disabled.
mysql_1 | 2017-09-21 17:15:10 139749943555968 [Note] Server socket created on IP: ‘::’.
mysql_1 | 2017-09-21 17:15:10 139749943555968 [Warning] ‘proxies_priv’ entry ‘@% root@bdeb933eaf44’ ignored in –skip-name-resolve mode.
mysql_1 | 2017-09-21 17:15:10 139749943555968 [Note] Reading of all Master_info entries succeded
mysql_1 | 2017-09-21 17:15:10 139749943555968 [Note] Added new Master_info ” to hash table
mysql_1 | 2017-09-21 17:15:10 139749943555968 [Note] mysqld: ready for connections.
mysql_1 | Version: ‘10.2.8-MariaDB-10.2.8+maria~jessie’ socket: ‘/var/run/mysqld/mysqld.sock’ port: 3306 mariadb.org binary distribution
wordpress_1 |
wordpress_1 | Warning: mysqli::__construct(): (HY000/2002): Connection refused in – on line 22
wordpress_1 |
wordpress_1 | MySQL Connection Error: (2002) Connection refused
wp_1 | PHP binary: /usr/local/bin/php
wp_1 | PHP version: 5.6.30
wp_1 | php.ini used:
wp_1 | WP-CLI root dir: phar://wp-cli.phar
wp_1 | WP-CLI packages dir:
wp_1 | WP-CLI global config:
wp_1 | WP-CLI project config:
wp_1 | WP-CLI version: 1.1.0
wp_wp_1 exited with code 0
wordpress_1 |
wordpress_1 | MySQL “CREATE DATABASE” Error: Access denied for user ‘username’@’%’ to database ‘username_db’
wp_wordpress_1 exited with code 1
“`
Hey Tanner,
Apologies in advance as I am in a rush here and may skim over some things so I can be sure to get this to reply to you before I have to leave.
Did you by any chance try to startup the containers and they when they failed delete and start again?
I do not have much info in the article about this (I guess I should add some info) but the database container uses a named volume for data persistence. That’s different to how the WP container handles persistence (WP container does it with a mounted directory from the host OS).
Named volumes persist between container restarts (and after container deletion) and are reconnected when a container is restarted or rebuilt. That volume will have the originally created db with the username and password used the first run.
To sort this and hopefully get your test setup running you should try to delete the named volume and then restart the containers.
First stop the containers and then run `docker volume ls` to see if there is a volume named ‘db_data’. It may be prefixed to something like ‘hostname_db_data’. Usually the prefix will be the project/folder name that the docker-compose.yml file is in.
Remove the container with `docker-volume rm db_data`. Change ‘db_data’ to match the name of the volume for your container if it has a prefix.
You should then be able to restart the containers and with a little luck it’ll connect like it’s meant to.
If this doesn’t work let me know and I’ll try and help solve the issue. Also feel free to catch me on Twitter or email me anytime if you have more questions 🙂 will@pattonwebz.com
Thanks for the reply. I stopped the mariadb container, removed the db_data volume but not sure what to change db_data name to? I thought db_data is a volume that exposes container files of a running image onto the host machine. I’m not exactly sure where I would have named the volume for my container except through the composer file that was provided and the file shows db_data.
The volume was named wp_db_data by the way.
Yep the volume name comes from the compose file here. You don’t need to rename it, you just need to make sure the contents are empty when the DB container starts.
If containers were stopped and you deleted the volume you should be able to restart the containers again and the db_data will be created again but this time it will be filled with the new dB name and user details.
Volumes are used to house the files for a running container and sometimes expose them to the host. There’s a few different types of volumes. The volume used in this article for the DB is called a ‘named volume’ and is created independently from the containers. It persists between container deletion and rebuild unless manually removed.
The volume type you are talking about, one that exposes files directly to the host os, is also used in these containers but that’s a different type of volume called a mounted volume and not the same as the one that is used to hold the actual files where the DB resides.
Again I apologize I do not have enough time to explain father at the moment as I’m on mobile and the keyboard is not great but I can elaborate more when I am back at my computer. Perhaps a better solution for your usage would be to change the type of volume or let docker handle it transparently – again I can provide an example next time I have a free moment at a proper keyboard.
This is a noob question. The images downloaded are never modified unless I commit changes that I make while logged into the container right? So if I restart the whole process I really only need to remove the volumes and the containers?
Also I removed all the containers and volumes, restarted the whole process but I keep getting a refused connection to the database when I’m spinning WP and the database up… and this is based on the composer file I had ^
Do you see anything wrong with the composer file?
This is a really excellent tutorial, and definitely the best docker-based one I’ve found. Thanks!
Sorry, i’m little confused about nginx-proxy configuration.
How i must configere nginx?
Thanks
p.s. can you push on “Git” a complete working example?
Solved…there is an error in your original docker-compose file of nginx…the image must be “jwilder/nginx-proxy” and not “nginx”
Hey Paolo,
Sorry about the mistake in the article, I’m glad you got this sorted.
I’ve fixed it now in the article, thanks to you for spotting it 🙂
This setup uses a lot of ram. The WordPress image you are using contains apache and is 36mb under zero load. Apache is a memory hog and will chew up ram as connections come in. Mysql container is 183mb under no load and also will increase size under load. There is a lot of extra over head here loading a webserver and mysql server for each wordpress site. If you use wordpress php-fpm image it is only 9mb and won’t use a lot of ram under load. If you use just 1 mysql container but use bash script to create database & user for each site then you also remove the overhead of multiple mysql servers. You can configure nginx cache with rules to bypass wp-admin in docker-gen template. With all that you will have faster and more ram efficient system. I haven’t configured it yet but I think it would fit many times more containers onto a server.
Hey Mike,
Thanks for taking the time to read the article 🙂
I can’t say I disagree that a webserver and database server per container is extremely inefficient for memory. It it. Very. However the article detailed here isn’t the whole picture. This is the starting point from which I hope people improve upon. And I really do hope you improve on it. If you do and you document it please come back with a link for others to reference in their own builds.
The article details a concept which I’ve worked on with some clients to build automated deployments. It is a working base from which a specific need can be created. That could mean going more than a single WP instance to the same DB container, almost certainly using an entirely different WordPress image built custom to the needs of the system being built and also sometimes even kernel rebuilds to add custom management features to the master nodes.
Essentially what I’m saying is the article details a working set-up for genetic usage cases and it can be itterated or improved upon depending on your need/desires in a hosting system for WP sites.
Hi William,
Thanks for the reply sorry if I sounded overly critical. The article is great. I have been trying to get my head around docker and this is the only article I’ve seen that has all the right components. My sticking point right now is making the docker gen template as I’ve never used Go before. I am not sure if there is an easy way to have multiple templates so for instance I could have a wordpress template, static site template, asp.net template etc.. or if I have to nest everything in one template then output it based on an environment variable. Not knowing Go I would definitely prefer the former. It feels like every day almost I have to learn another new language.
Just occurred to me I could run multiple docker gen containers. If I get it sussed I’ll come back and drop a link to a gist or something.
I think i get it running by adding expose 3306 too the mysql part.
but i am still getting a 503 from nginx-proxy, dunno why
Hey Chris,
Sorry it’s not working for you. It sounds like perhaps you don’t have the containers set on the same network. You need to make the network outside of the docker file and then place the containers into it (the article has details of how to do that before the sections about creating your docker-compose file.
Pingback: 100 Days of Code Challenge - Week 2 - William Patton - @PattonWebz