Putting WordPress Docker Containers in Production – Building WordPress Images
This series charts the ups and downs of putting WordPress containers into production.
I’ve been using Docker on my local development machine for some time. It makes it easy to start, stop and rebuild development environments in seconds and have different configurations for different projects as required. What I have never done is put anything running inside a container into production.
To test the viability of running WordPress sites through containerized infrastructure in production I’ve picked 3 sites that are not mission critical and will be moving them onto a server where they will run entirely inside containers.
The Preface – Communication is Hard!
There are many articles online showing how to get the WordPress container, connect it to a MySQL container and start it. They instruct you to inspect the container, find its private IP and connect to it with that through your browser. That is generally where those articles stop. I found it a lot harder to find well written and detailed articles with instructions of how you would go about connecting to those WordPress instances by domain name, from the open internet.
I discovered a lot from looking for that information and I’ll let you into a secret – running the containers is the easy bit.
What is not as easy to understand is how Docker networking works. There is a whole layer of networking that is abstracted away by Docker so that it can enable communication between containers and the host OS. You can think of the abstracted layer as being the private layer of networking to make it easier to digest.
That semi-private networking layer is how containers communicate privately. The layer above that – lets call it the public layer for consistency – is what people use when accessing the open internet. You need to somehow find a way to bridge those 2 layers so that public requests can be directed through the private network and vice versa.
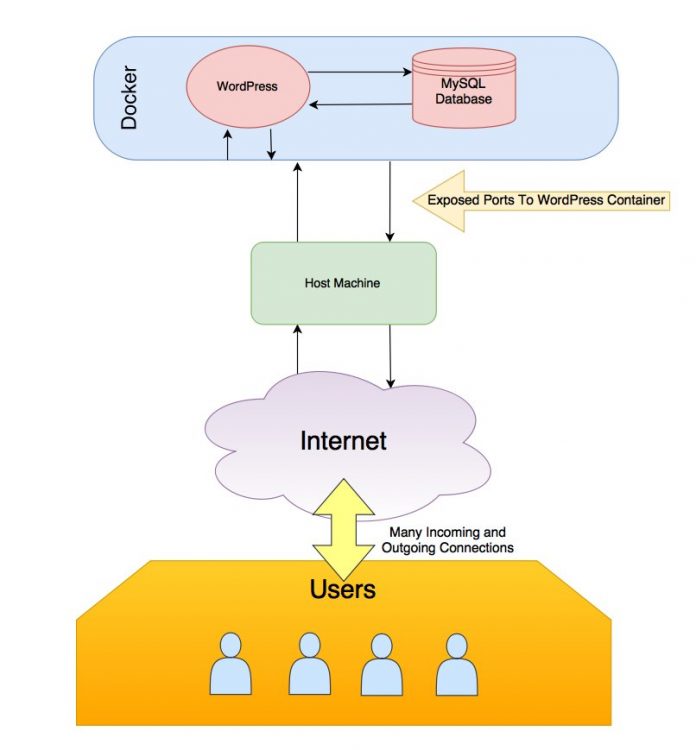
Trying to understand how the networking layers work within and alongside Docker is one of the hardest concepts to grasp for me. Docker gives us a way to bridge the private and the public networks very easily by allowing us to expose ports from the containers directly in the Host OS. It can be quite difficult to understand in text so I made a quick diagram to show an overview of the main points.
Deciding What Docker Images To Put Into Production
The illustration above shows that 2 containers are going to be needed in order to get WordPress running with Docker.
There is an official image for both WordPress and MySQL available from Docker Hub. I’ve used them many times when working on WordPress installations locally.
Locally I don’t worry about caching layers but in production I use Memcache. The official WP image doesn’t ship with memcached installed or enabled so we’re going to need to build a custom image to add support. The MySQL images will run just fine as-is.
The WordPress Containers
The sites will run PHP 7.1 through Apache2 it should to have memcached available to use. I have already built this image and it’s available through Docker Hub. You can pull it with docker pull pattonwebz/wordpress-php7-1-apache-memcached or just reference pattonwebz/wordpress-php7-1-apache-memcached as the image for the container in a run command or compose file.
Additionally being able to run WP-CLI commands without having to get a bash terminal inside the container is a bonus. I built an image for that as well that is based on the official WP image. and you can reference it at pattonwebz/docker-wpcli.
Building the WordPress Container Images
I have already built both the WP image and the WP-CLI image that I plan to use. You can them images in your run commands and pull them directly from Docker Hub with their reference IDs – but if you’re interested in how they’re built read this section.
The built images can be grabbed here –
Building a Custom WordPress Docker Container with PHP 7.1 and Memcached Support
There’s an official WordPress image available that works great for running WordPress sites. I use it all the time in my local development environments. Since I know it to work that will be my starting point for the custom container. The only changes to the build is that I want to install some packages and enable memcached support in the container. I can do that with just a single run command in the Dockerfile.
You can find the php7.1-apache Dockerfile and entrypoint.sh for the WordPress image in the official repo.
Save them both in a folder and open the Dockerfile for edit. To sum up what the code in the file does: starts the image build for the container FROM the php:7.1-apache image, installs some dependencies & updates some PHP settings then gets WordPress, unpacks it and puts it into the correct directory. Finally it does some init work to get Apache2 and WordPress configured and running.
To add memcached inside the container we must to add another RUN command to the file. I add this just before the VOLUME command but anywhere between the FROM and the VOLUME is a sane place to put it. I am aware that the point which I chose to add the new command is after the sources list from apt is deleted. I’m ok with grabbing them twice during build as keeping things separate from the original file contents makes it easier for me to update the Dockerfile in future based on improvements to the official WP image.
# installs memcached and enables it in apache
RUN apt-get update && apt-get install -y libmemcached-dev zlib1g-dev && pecl install memcached-3.0.3 && docker-php-ext-enable memcached
Above I have the command on a single line, inside the Dockerfile it’s split to multiple lines for clarity but performs the same tasks. This is the updated Dockerfile.
FROM php:7.1-apache

# install the PHP extensions we need
RUN set -ex; \
	\
	apt-get update; \
	apt-get install -y \
		libjpeg-dev \
		libpng12-dev \
	; \
	rm -rf /var/lib/apt/lists/*; \
	\
	docker-php-ext-configure gd --with-png-dir=/usr --with-jpeg-dir=/usr; \
	docker-php-ext-install gd mysqli opcache
# TODO consider removing the *-dev deps and only keeping the necessary lib* packages

# set recommended PHP.ini settings
# see https://secure.php.net/manual/en/opcache.installation.php
RUN { \
		echo 'opcache.memory_consumption=128'; \
		echo 'opcache.interned_strings_buffer=8'; \
		echo 'opcache.max_accelerated_files=4000'; \
		echo 'opcache.revalidate_freq=2'; \
		echo 'opcache.fast_shutdown=1'; \
		echo 'opcache.enable_cli=1'; \
	} > /usr/local/etc/php/conf.d/opcache-recommended.ini

RUN a2enmod rewrite expires

# installs memcached and enables it in apache
RUN apt-get update && apt-get install -y libmemcached-dev zlib1g-dev \
&& pecl install memcached-3.0.3 \
&& docker-php-ext-enable memcached
VOLUME /var/www/html

ENV WORDPRESS_VERSION 4.7.2
ENV WORDPRESS_SHA1 7b687f1af589c337124e6247229af209ec1d52c3

RUN set -ex; \
	curl -o wordpress.tar.gz -fSL "https://wordpress.org/wordpress-${WORDPRESS_VERSION}.tar.gz"; \
	echo "$WORDPRESS_SHA1 *wordpress.tar.gz" | sha1sum -c -; \
# upstream tarballs include ./wordpress/ so this gives us /usr/src/wordpress
	tar -xzf wordpress.tar.gz -C /usr/src/; \
	rm wordpress.tar.gz; \
	chown -R www-data:www-data /usr/src/wordpress

COPY docker-entrypoint.sh /usr/local/bin/

ENTRYPOINT ["docker-entrypoint.sh"]
CMD ["apache2-foreground"]
Once you have the additional RUN command added save the file and return to the file in the directory in a terminal.
Running the Build Process for a Docker Image
Now that you have an updated Dockerfile you need to build the image so it’s available when you want to use it for a container. We do not need to do anything special for this build process – other than give it a label so we can reference it easily.

# make sure to include the '.' at the end
docker build -t wp-php7_1-memcached .
The build process will take a while and you will see a lot of output in the terminal. So long as it ends with a success message and a container ID things went well.
Successfully built b5d893652bc0
Starting your WordPress Container
I find the easiest way for me to store configurations for containers is by using docker-compose. A docker-compose.yml file is used to store the configuration of 1 or more containers and they can be started with a simple docker-compose up command.
An example docker-compose file to start the new WordPress container, a database container and a separate (not always running) WP-CLI container looks like so:
version: '2'

services:

  wordpress:
    image: pattonwebz/wordpress-php7-1-apache-memcached
    ports:
      - 80
    expose:
      - 80
    restart:
      on-failure:10
    environment:
      WORDPRESS_DB_USER: database
      WORDPRESS_DB_PASSWORD: mkPwPAP4
      WORDPRESS_DB_NAME: wp_database
      WORDPRESS_TABLE_PREFIX: wp_
      WORDPRESS_DB_HOST: mysql:3306
    volumes:
      - ./wordpress:/var/www/html

  mysql:
    image: mariadb
    environment:
      MYSQL_ROOT_PASSWORD: willGeneateRandomPasswordForRoot
      MYSQL_RANDOM_ROOT_PASSWORD: "yes"
      MYSQL_DATABASE: wp_database
      MYSQL_USER: database
      MYSQL_PASSWORD: mkPwPAP4
    volumes:
	  - ./db_data:/var/lib/mysql

  wp-cli:
    image: pattonwebz/docker-wpcli
    volumes_from:
	  - wordpress
    links:
	  - mysql:mysql
    entrypoint: wp
    command: "--info"
If you save that as docker-compose.yml and run docker-compose up you will see it grabbing the images if it needs them and then starting the containers. In the terminal after the containers start you will see the log messages for all 3 containers in a single stream.
Note that in the above docker-compose.yml file there are hardcoded passwords in plain text. It’s obvious that is not a secure way to handle them. Docker introduced secrets to handle including sensitive data so that we do not need to store it in plain text. I’ll detail how to use secrets here another time.
# starting with the -d flag instructs docker to start the containers in daemon mode - IE in the background
docker-compose up -d
# stop containers with this command
docker-compose stop
How To Move a Single Local WordPress Docker Instance a Multiple Instance Production Setup
Moving from single local instance to a production server capable of managing more than one instance is where my experience of using Docker for WordPress Development ended. I understood the basic idea was that I could run my WordPress containers and proxy them. I once made this happen by having WP bind to port 8080 and, using an already installed and running apache server, manually added the vhost with proxy_pass() enabled inside it. That actually worked perfectly fine. It was technically in production but required too much manual work to be viable.
Unless you explicitly state a network and IP address when starting the container Docker will issue whatever IP address is next in its table any time a container is started. So each container start would involve me adjusting the vhost in apache. Sure, with a single instance that only restarts on command (assuming it runs without exiting due to an error) but it would be a futile battle if containers started and stopped frequently or you have more than a few to handle.
So what is needed is an automatic way to handle these changes. While we’re at it let’s run that in its own set of containers as well.
Unfortunately that is not covered in this article – it warrants its own article detailing how to start a container to act as a reverse proxy and how to get it to automatically update it’s config files based on status and address of a container. While we’re working with a reverse proxy why not let it grab SSL certificates from LetsEncrypt while it’s doing it.
The next article covers running the proxy, getting it to discover started instances and configuring SSL for the domain.

Hi – Just starting out with Docker. Trying to compile your example and getting an error: Step 10/12 : COPY docker-entrypoint.sh /usr/local/bin/
lstat docker-entrypoint.sh: no such file or directory
Is this a file I need to create?
Thanks, great article!
Ken
Hey Ken,
The docker-entrypoint.sh file is the same as the one from the official WordPress dockerhub image for php7.1. You can get it here: https://github.com/docker-library/wordpress/tree/b807f1285869a220a5f72b935901603e5bde8822/php7.1/apache
Just download the file from there and put it into the same folder as the Dockerfile.
Also I have a repo that you can clone and build the image from here or you could pull the pre-built image from here 🙂
Let me know if you have any more problems and I’ll do my best to help.
That worked great. Thanks so much for the help William. Really like your articles. Very clear. Best I’ve found yet!
Glad that worked for you and thank you for the kind words 🙂
If you have any other questions feel free to send them my way.
One more quick question. Everything is working great, but when I do a docker-compose-stop and restart, the port 32812 increments.
That’s expected behavior. I’m not sure what is called so I can’t quickly finnd references.
It works sort of like this: there are a pool of addresses and ports available. Each time one is requested (such as when containers start) the NEXT available one is issued. When a container stops it’s addresses and ports are added to the END of the pools.
Things like that are a somewhat standard networking behavior to minimise chances of re-leasing an address immediately (which gives anything trying to access the old services at the address a chance to realize it no longer points to what it used to).
In some situations it is better to assign a port specifically. If you wanted the container to retain the same port binding each time you could do that by adding an EXPOSE in the compose file.
That makes sense. 🙂 Thanks again!
Nice article ,
How would you handle having 2 sites both need to be in docker, ofcourse biding port 80:80 more than once work work.
what would be your idea solution in such a scenario ?
Hey, sorry for the late reply. Since each WP container is it’s own instance (with it’s own private IP and networking overlay) it is perfectly fine to bind 2 of them to port 80 on their own IPs 🙂