Building a Grunt WordPress Theme to Run Common Theme Builder Tasks
This guide will walk you through the basics of building a Grunt WordPress Theme. Starting with installing Node and getting Grunt into your theme directory. Then installing plugins & configuring tasks to work on your WordPress theme files. At the end of the article you’ll have the skills you need and a good starting point to use Grunt in your next theme build project.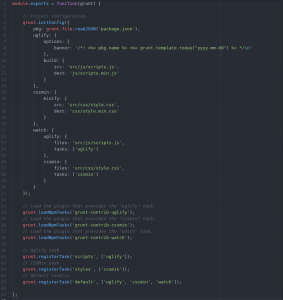
You can grab a copy of the starter Grunt WordPress Theme I built fo the code examples at the GitHub repo for this article.
This article is written from the perspective of you using Ubuntu as your development machine, installation of Node and npm will differ depending on your OS but the Grunt commands are universal. If you want the quick version of this then skip the the end where it says TL:DR.
Installing Everything Needed to Run Grunt
Grunt is a JavaScript task runner built around Node.js. You’ll need to install Node.js for it to run and npm will make working with packages much easier. With a TaskRunner automate many processes to make your job easier or less tedious.
Npm is the Node Package Manager – it’s used to install any packages, and dependencies of those packages, used in a Node project. Install Node.js and Node Package Manager (npm):
# note that on Ubuntu node is packaged as 'nodejs'
sudo apt-get install nodejs npm
Then use npm to install the Grunt command line interface globally so that you can run it from any directory. Have npm install it and pass the -g flag to instruct it you want a global installation.
npm install -g grunt-cli
Once grunt-cli is installed you should navigate to your project directory and get ready to add your files. First thing is defining your project.
Command Not Found Error on Ubuntu
On Ubuntu you might get a command not found error like the one below when you try and run Grunt later. There’s an easy fix.
No command 'grunt' found
The reason that it can’t find grunt is because in Ubuntu the node package is actually called nodejs. A simple fix is to symlink the nodejs package to node so that when you run grunt it can find the node binary file where it expects.
ln -s /usr/bin/nodejs /usr/bin/node
Starting a Grunt WordPress Theme
In a typical project you’ll have 2 main files for dealing with the task runner. The package.json file and the Gruntfile.js. Package.json contains all the details about your project including a list of other node packages your project uses or depends on, the Gruntfile contains the configuration and task instructions for your project.
You can have npm make a package.json file for you. The defaults are generally ok – the only thing you need to change here is the entry point – which will be Gruntfile.js. It’s a good idea to add a name to the author field and set a licence. Running npm init will prompt you to enter details like the following output.
$ npm init
This utility will walk you through creating a package.json file.
It only covers the most common items, and tries to guess sane defaults.

See `npm help json` for definitive documentation on these fields
and exactly what they do.

Use `npm install  --save` afterwards to install a package and
save it as a dependency in the package.json file.

Press ^C at any time to quit.
name: (wp-theme)
version: (0.0.0)
description:
entry point: (index.js) Gruntfile.js
test command:
git repository:
keywords:
author: William Patton
license: (BSD-2-Clause) GPL-v2
It will then show you what it’s about to write and ask you to confirm.
About to write to /home/williampatton/git-repos/wp-theme/package.json:

{
  "name": "wp-theme",
  "version": "0.0.0",
  "description": "",
  "main": "Gruntfile.js",
  "scripts": {
    "test": "echo \"Error: no test specified\" && exit 1"
  },
  "author": "William Patton",
  "license": "GPL-v2"
}


Is this ok? (yes)
Adding Grunt Packages

The reason TaskRunners exists is so that certain commands or steps that need run during development or at build time can be run in an automated way. There are packages available for a lot of common tasks used in many project types. In Web Development a common grouping of tasks is to handle minification of styles and scripts. We can use npm to install some packages to do that for us. We can even set it to watch for us changing the files and trigger tasks whenever we change a file.
When we run tasks during development or at build time the packages used to do that only need to exist in the dev environment. Those dev dependencies are called just that in Node and can be installed in just the dev environment with the –save-dev flag.
Any packages you instruct npm to install will automatically be added to the package.json file. Packages are installed for use in development with the --save-dev flag.
npm install <package-name> --save-dev
If you know what packages you plan to use you can go ahead and add them to the file manually now – be sure to run npm install afterwards to install the manually added dependencies. When the package.json file has packages set to be installed in development only it’ll look something like this:
{
  "name": "wp-theme",
  "version": "0.0.0",
  "description": "",
  "main": "Gruntfile.js",
  "scripts": {
    "test": "echo \"Error: no test specified\" && exit 1"
  },
  "author": "William Patton",
  "license": "GPL-v3",
  "devDependencies": {
    "grunt": "~1.0.1",
    "grunt-contrib-cssmin": "~1.0.1",
    "grunt-contrib-uglify": "~2.0.0",
    "grunt-contrib-sass": "~1.0.0",
    "grunt-contrib-watch": "~1.0.0"
  }
}
Remember that if you add packages manually here they still need installed by running npm install after you save the file.
Adding Grunt Packages to the Project
The Grunt package will be the first thing to add to your project. Use npm to install it in the dev environment.
npm install grunt --save-dev
You’ll see a heap of output fly across your screen. What’s happening is npm is checking it’s index for the package, grabbing it and it’s dependencies and then installing them into the node_modules directory.
You might wonder why we need to install grunt when we have grunt-cli installed globally. Grunt-cli is just an interface for interacting with a Grunt install. You have the cli globally but it interacts with local instances of grunt – that way you can have different grunt configs and tasks in each project or directory.
Adding Packages for Tasks
Next we install the packages we’ll need to run our tasks – 3 packages total.
npm install grunt-contrib-uglify grunt-contrib-cssmin grunt-contrib-watch --save-dev
Now that Grunt is installed and we have the packages we need for our tasks it’s time to make our Gruntfile.
Create a file called Gruntfile.js in the project root and add this code.
module.exports = function(grunt) {

  // Project configuration.
  grunt.initConfig({
    // read the package.json file so we know what packages we have
    pkg: grunt.file.readJSON('package.json'),
    // config options used in the uglify task to minify scripts
    uglify: {
      options: {
        // this adds a message at the top of the file with todays date to indicate build date
        banner: '/*! <%= pkg.name %> <%= grunt.template.today("yyyy-mm-dd") %> */\n'
      },
      build: {
        src: 'src/js/scripts.js',
        dest: 'js/scripts.min.js'
      }
    },
    // config options for the cssmin task to minify stylesheets
    cssmin: {
      minify: {
        src: 'src/css/style.css',
        dest: 'css/style.min.css'
      }
    }
  });

  // Load the plugin that provides the "uglify" task.
  grunt.loadNpmTasks('grunt-contrib-uglify');
  // Load the plugin that provides the "cssmin" task.
  grunt.loadNpmTasks('grunt-contrib-cssmin');

  // Uglify task
  grunt.registerTask('uglify', ['uglify']);
  // CSSMin task
  grunt.registerTask('cssmin', ['cssmin']);
  // Default task(s).
  grunt.registerTask('default', ['uglify', 'cssmin']);

};

Rundown of a standard looking Gruntfile.js
In this code we have a wrapper function – module.exports = function(grunt){}; – and inside that we load our packages file then continue to initialize our tasks with options.
Inside the initConfig() function we define 2 sets of options, one for ‘uglify’ and a second for ‘cssmin’.
At the end we load the 2 plugins for the tasks the options are defined for using grunt.loadNpmTasks() and finally we register 3 tasks – 1 for each of our plugins and another that is the ‘default’ task which runs whenever we don’t specify a task to run.
This Gruntfile.js assumes you have your original stylesheet here: src/css/style.css and your original JavaScript file here: src/js/scripts.js. If it finds them it will uglify and minify them and place them in their corresponding /css/ and /js/ directories.
Running Grunt for the First Time
Now that you have some tasks it’s time to run some. Note that the project doesn’t yet have any files in the src/js/ or src/css/ directory.
If you type in just ‘grunt’ with no arguments or other parameters it’s run whatever is defined in the ‘default’ task. In the case of the Gruntfile.js above those are the uglify and cssmin tasks.
$ grunt
Running "uglify:build" (uglify) task
>> Destination js/scripts.min.css not written because src files were empty.
>> No files created.

Running "cssmin:minify" (cssmin) task
>> 1 file created. 0 B → 0 B

Done.
Interestingly the Uglify task indicated nothing was done due to there being no files but CSSMin created an empty .min.css file. Depending on the situation that could be considered a bug or a feature.
Since no specific task was passed in our grunt command it ran the ‘default’ task – which is set to run both defined tasks. You could run either task on it’s own with grunt scripts or grunt style – just pass the name of the registered task after grunt.
A really useful plugin common in grunt projects is the watch package. It watches files for changes and triggers tasks based on what files have changed. We can use that to rebuild our styles and scripts whenever we save a change.
There are now 3 tasks defined in Gruntfile.js
- The Scripts task – Runs Uglify to minify JavaScript.
- The Styles task – Runs CSSMin o minify StyleSheets
- The Watch task – Runs a task to watch your working files and trigger other tasks when they change
The updated Gruntfile.js looks like this:
module.exports = function(grunt) {

	// Project configuration.
	grunt.initConfig({
		pkg: grunt.file.readJSON('package.json'),
		uglify: {
			options: {
				banner: '/*! <%= pkg.name %> <%= grunt.template.today("yyyy-mm-dd") %> */\n'
			},
			build: {
				src: 'src/js/scripts.js',
				dest: 'js/scripts.min.js'
			}
		},
		cssmin: {
			minify: {
				src: 'src/css/style.css',
				dest: 'css/style.min.css'
			}
		},
		watch: {
			uglify: {
				files: 'src/js/scripts.js',
				tasks: ['uglify']
			},
			cssmin: {
				files: 'src/css/style.css',
				tasks: ['cssmin']
			}
        }
	});

	// Load the plugin that provides the "uglify" task.
	grunt.loadNpmTasks('grunt-contrib-uglify');
	// Load the plugin that provides the "cssmin" task.
	grunt.loadNpmTasks('grunt-contrib-cssmin');
	// Load the plugin that provides the "watch" task.
	grunt.loadNpmTasks('grunt-contrib-watch');

	// Uglify task
	grunt.registerTask('scripts', ['uglify']);
	// CSSMin task
	grunt.registerTask('styles', ['cssmin']);
	// Default task(s).
	grunt.registerTask('default', ['uglify', 'cssmin', 'watch']);

};
Now after you run the default tasks with ‘grunt’ it will keep running watching your style and script files and when they change the corresponding task will be run to rebuild them.
Adding Some Files to the Project
Now that we have grunt and plugins to work with it’s time to start thinking about adding or creating our files for this project.
Since I work with git in most of my projects I like to add a .gitignore file at the outset. For a node project the node_modules folder should be kept out of a project repo as should the log. Those are for development only in most cases. There may be times where you want a file nearby but not in the repo – I added tmp directory for that reason.
The .gitignore file contains.
node_modules
.npm-debug.log
tmp
The next thing that I’ll add here is a licence file. Since WP uses GPLv2 or later that’s what I’ll be including. You can get a copy of the GPLv2 licence from the GNU site.
Adding WordPress Files
Next we can start thinking about WordPress theme files.
The minimum requirements for a WP theme are simple. You need style.css to define your theme (and hold the styles) and index.php to output content.
The style.css file should start with a comment that outlines your theme. The syntax below is what’s recommended.
/*
Theme Name: WP Theme
Theme URI: http://www.pattonwebz.com/
Description: A WordPress theme built with love! (and Grunt)
Version: 0.1
Author: William Patton
Author URI: http://www.pattonwebz.com
License: GPLv2 or later
License URI: https://www.gnu.org/licenses/gpl-2.0.txt
*/
The index file is going to vary on every site. To start off I’m going to make an extremely basic page – it’ll evolve based on how the site design progresses. I won’t paste the entire file here as it’s quite lengthy – and not really necessary to document. Instead here’s a link to what I used at this stage in the git repo if you’re interested in seeing it.
Another file that’s going to be required is a functions.php file. That’s where WordPress starts to load the theme from and it’s from there that scripts and styles can be enqueued.
Getting to the Good Bits
Now that we have a base theme in place and grunt installed it’s time to get to the fun part of building your theme. Remember the stylesheet to work in should be located at /src/css/style.css and will compile to /css/style.min.css. The script that we work with should be located at /src/js/scripts.css and will compile to /js/scripts.min.js.
The compiled files are what will be enqueued to output to your pages by WordPress.
This is just 1 basic example of how to include Grunt in a WordPress theme but your Grunt tasks can get more complex and much more useful. I discovered that recently when I decided to use Bootstrap 4 in a theme by including the base styles and scripts and running the build process myself. You can check out a Gruntfile.js from one of my themes that is a more along the lines of what you would end up with in a completed theme.
TL:DR
If you’re already familiar with Grunt and npm then run through the commands here to quickly get things up and running. You will need to provide some details to npm init and fill the content in the Gruntfile.js, style.css, index.php and functions.php files. If you’re unsure what should go in any of those you can see some examples in the GitHub repo for this article.
# install node, npm
sudo apt-get install nodejs npm
# symlink nodejs to node
ln -s /usr/bin/nodejs /usr/bin/node
# install grunt-cli globally
npm install -g grunt-cli
# make project directory and generate package.json
mkdir wp-theme
cd wp-theme
npm init
# install packages locally to the project for development
npm install grunt-contrib-uglify grunt-contrib-cssmin grunt-contrib-watch --save-dev
# make Gruntfile.js and add the config
nano Gruntfile.js
# make some directories, add some files that will be used when building the theme and some to make the theme
mkdir src
mkdir src/js
mkdir src/css
touch src/js/scripts.js
touch src/css/style.css
nano style.css
nano index.php
nano functions.php
# run grunt
grunt